March 23, 2012

Oh, those wary fish!

Spring is rapidly upon us here is southeast Idaho and so the winter snow melt/run off is just around the corner. We didn't get that much snow this year, but I'm sure the run off will swell the creeks for a little while. At that time I will head out to the lakes to float tube for about a month.

With this in mind, I went back out to the Black Canyon of the Bear River to work on my tenkara. The river was at 98 cfs and slightly off colored. The weather was delightfully warm, at 68 degrees F, but that blasted wind was blowing upstream at a straight 8 knots. There is no where to escape from the wind on this river. The sun was bright with mostly a blue sky and this made the trout wary. There was a nice BWO hatch underway, along with small midges hatching.

Smooth water means wary fish

Because if the plentiful sunshine the fish were extra wary. They also were very picky! I finally got to land a few using a #18 black midge emerger. Not a single kebari or BWO imitation would entice them to take.  I used a 6 foot fluorocarbon tippet even. They refused the RS2, BWO para-emerger, BWO Vis-a-Dun, Utah Killer Bug (of varying sizes), and Purple Haze kebari. I did hook one on a #16 BWO bunny dun but my Davy knot slipped.

I'll try them again next week, unless the river begins to rise.


March 20, 2012

Tenkara Guides LLC; a review

I have not been fishing tenkara for very long, but I have been western fly fishing for over 20 years. I now have dabbled just enough into tenkara to know that I do not really fish tenkara and that I needed some instruction. It just so happens that I live fairly close to Utah, the home of Tenkara Guides LLC.


Tenkara Guides LLC was created by three tenkara fisherman (Erik Ostrander, Rob Worthing, John {I don't know his last name}) from Utah. From their website: "We are a tenkara based fly fishing guide service specializing in Utah streams and rivers.  We provide a first rate guiding experience using unique, effective and easy to learn methods of tenkara fly fishing perfectly suited for Utah’s waters.  Our experienced tenkara fly fishing guides will design a unique trip customized to your schedule, level of adventure and experience." They were the first Tenkara Certified Guides by Tenkara USA. With their expertise in tenkara, I thought I would take advantage of their close proximity and schedule a trip.

So, I went to Tenkara Guides LLC website  and used the "contact us" link to send an email of my desire to hire a guide on March 16th. The next day I had an email from Erik (he spells his name ERiK). He stated that that day was open and he gave me his phone number so that I could call in a few days so to discuss what I desired out of the trip. Now, before I go on, let me say that I really like this in a guide service. I have hired fly fishing guides before and most of them, dare I say, only care about their clients catching fish. What I got from Erik wanting to talk to me is that he is desired to make sure that the trip was more than just catching fish! He wanted to make sure the trip was what I wanted!  What a concept! As it so happened, I explained to him that I wanted to learn tenkara from him, to fish some smaller freestone rivers, and also fish the Provo River. He said all of that was definitely possible and so we arranged payment. I payed Tenkara Guides $395.00 through Paypal. The whole process of hiring was very easy.

Erik contacted me a few days before the scheduled day to let me know what flies to bring. I have all the stuff: waders, boots, rods, various lines, tippet, etc. He made sure that I would be set. So I tied up some various flies: Utah Killer Bugs, Purple Haze kebari, etc., and was ready.

March 16th I drove done to meet Erik in the north parking lot of Cabelas, near Alpine, UT. I was to meet him at 0900. He was there right on time. After a brief introduction we headed into Cabelas for my license. My out of state one day permit was $12.00! What a bargain! We then loaded up his car and off we went -- first to the American Fork River, just up to road.

Erik teaching the Davy knot
The Ito at work on the American Fork River: boulders, pockets, pools
We arrived at a section of the river that he thought would be a good outdoor classroom for tenkara. The day was forecast to be cloudy with wind gusts, but when we arrived it was warm, sunny and very little breeze. Dare I say it -- perfect! We geared up (me with my three rods, small chest pack, and camera)  Erik with his arsenal of rods, fly boxes, goodies for the client, etc. He had me get my Ito lined up and he asked me to cast -- right there in the road! He analyzed my cast, made some suggestions, and gave me the OK. I must have done OK since he appeared content after watching only a few casts. We headed down the road to a location to enter the river.

The American Fork River is a classic freestone with amazing pocket water. The water shoots between rocks and creates small eddies and short lived foam lines. Sometimes the foam would accumulate in more permanent eddies or what Erik calls "froggy water". He instructed me on his lingua franca so that I could understand his instructions. The fast runs he calls "tongues" and the small calmer water or eddies to the sides of the tongues he calls "tonsils". With that we scrambled down the bank to the water.

A typical stretch of the river
Erik immediately went into guide mode. He began pointing out water that held fish. I got the distinct feeling that he had personally knew those fish! I went to put a Utah Killer Bug on my tippet and he began teaching me how to be more efficient at tenkara. Erik has a blazingly fast way of tying a fly to his tippet: he uses the Davy knot. I have used the Davy knot before, but not like Erik. In two quick motions the fly is on the tippet. I recorded him teaching me how it is done -- you can see it on the video at the end of this entry.

Erik instructing on how to cast into very tight quarters with a 13 foot rod......

.....choke up on the handle and loop the rod tip towards that 6 inch wide target


Well, once the fly was on he had me systematically work the water. After only a few minutes I had hooked two fish, both browns -- one to hand, the other long line released -- not bad for the first 15 feet of river. From here on up the stream we crawled over large rocks, under low hanging trees, waded fairly deep pools all in quest of skittish mountain trout. As I cast he instructed. This was exactly what I wanted in a tenkara trip. He was excellent in his guide persona; it was like fishing with a good friend. He pointed out where and how I should cast. He was patient with me as I hooked a bazillion tree branches and lost a whole lot of flies. He helped me in every facet of this "full contact" fishing experience. I caught over a dozen browns as we worked our way up the creek, but it was the instruction that I really enjoyed. BTW, most of the trout were caught on the amazing Utah Killer Bug. A few others took the Purple Haze kebari.

Netting one of the browns

We had started about 1000, but at 1500 hours we stopped for lunch. I was beat, needless to say. I had not fished commando-style for many a year and I was feeling it. But I was also having the time of my life! As Erik got out his backpacking stove to heat up some delicious Chinese food I wandered down to the river. I cast a Purple Haze into some "froggy water" and within seconds had hooked another fish, this time a 10" rainbow.

Another American Fork brown

After the quick, but satisfying lunch we packed up and headed for the lower Provo River. The weather had began its forecasted change to cloudy skies and some breeze. We geared up again and walked to a stretch of the river were Erik thought there may be some risers. He was right. In a calmer section of this larger river there were some trout sipping on midges. We slowly and painstakingly waded towards them and then, one by one, took them on either a CDC midge dry or on a small dark kebari dropper. It was a blast! It was the type of fishing where you see a trout rise, you cast (as only tenkara can do) with precision and a feather light landing 2 feet in front of the fish and -- WHAM! -- fish on! It was great! What a excellent trip, what a fantastic day. We would have fished until dark, but I had to meet my parents so we wrapped it up at about 1830 hours.

Lower Provo River: The master contemplating what fly to use next
A Provo River brown that took the Utah Killer Bug
Slower water on the Provo means midging fish


Conclusion: I highly recommend Tenkara Guides LLC and especially ERiK. I give him an enthusiastic two thumbs up!  Five stars!! You get the point. I did not get a chance to meet Rob or John, but if they are anything like Erik then this a world class guide service. If you want to learn about tenkara, or learn more about tenkara, then I would recommend you contact them for a half or full day guided trip to some of the Wastach Front's excellent waters. You will not be disappointed! I plan on rebooking with them soon. I have so much more to learn!

Addendum: I was not able to get video of most of the fish that I hooked and landed. I was too busy having fun to notice that my camera wasn't running! Oh well, I did record a few with the GoPro. I also recorded Erik teaching, as he does so well. Once again, you may want to view it in YouTube. 


March 19, 2012

Tip Plug control

What do you do with the tip end plug of your Tenkara rod when you are fishing? Leave it in the car? Put it in your pocket? Loose it to those sneeky gremlins that hide everything (including your left socks from the dryer)?

Well, when I was recently fishing with Erik Ostrander of Tenkara Guides, he showed me the way that he keeps track of those end plugs. He drills a hole through them and then attaches a chain or string. He finds this helps him not loose the plug as easily.

When I saw this I said to myself "Duh"!! I should have thought of that! Sometimes the obvious just doesn't enter into my brain. So when I got home I took my rod end plugs out to the drill press and drilled a 7/64th hole though them. I then passed some Dacron backing material through the holes and tied some loops.

Left to Right: Iwana-12, Amago, Ito

Now I can use these loops to attach the end plug to my micro chest pack. No more lost end plugs!

End Plug attached with Dacron loop

Some things are so obvious!

March 18, 2012

TrailLite Designs Ebira Plus

I recently went on a Tenkara trip with Tenkara Guides. I needed something to carry my rods in for the trip so I purchased a Ebira Plus from TrailLite Designs.


TrailLite Designs offers three styles of ultralight Tenkara rod carrier: Ebira, Ebira Plus, Ebira Guide. As you could guess, the Ebira Plus carries more than the Ebira and less than the Ebira Guide.

From TrailLite Designs: "Ebira means quiver in Japanese. The Ebira ("ey-beer-ah"), by TrailLite Designs, is a quiver for a tenkara fly rod. In keeping with the spirit of tenkara fishing the Ebira is a simple, practical and highly functional fly fishing system that is perfect for ultra light backpacking and fly fishing. The Ebira carries your fly fishing essentials in a clip on pocket at your hip. Both the quiver and the pocket provide easy access without removing the Ebira." Here are its specifications:
  • Materials: Dyneema X (TM), ultra strong and very durable.
  • Weight: 2.5 oz complete with carry cord and attachable pocket.
  • Size: 4.5" (2.25" per rod sleeve) x 22.5" long quiver.
  • Two separated rod sleeves.
  • Single, large, attachable pocket.
  • Adjustable 2mm carry cord. 
I ordered my Ebira Plus on March 1st, 2012 from directly TrailLite Designs. I received it on March 7th. It came via USPS in a small, flat padded envelope.

The Ebira Plus is exactly as advertised. This is a no frills rod carrier that gets the job done. It is amazingly light, but sturdily built. The materials appear to be of high quality. The stitching is tight and the thread appears to be high quality as well.

It is designed to be carried over one shoulder and not to be in the way of casting. It can be switched from one shoulder to the next with changing the clip position at the "bottom" of the Ebira.

Clips to change from right-sided carry to left

The carrier has two chambers that is designed accommodate one Tenkara rod each. My chambers are just wide enough that I can carry two rods in each chamber if neither has EZ-Keepers on them, and if they are placed head to butt. I can carry my Iwana-12 and Amago in one chamber and my Ito in the other. That is probably more rods than I would need on any one outing, but its nice to know that it can be done! BTW, since the sleeves are 22.5 inched long, the tipward 3 inches of my Ito sticks out. This is not an issue for me. My Iwana-12 and Amago together fit fully inside the sleeve (although in the picture below I have them peeking out just a little so you can see how they fit in the sleeve).

Ebira Plus with rods (Ito, left; Iwana-12, Amago, right)

Part of the shoulder strap is wide, so not to cut into your shoulder. On this strap there is a simple daisy chain for attaching accoutrement's like nippers, hemostat, floatant, etc. The Ebira Plus can essentially function as an over the shoulder lanyard that can also carry your rods as well -- very cleaver!

Shoulder strap with daisy chain

The adjustable portion of the should strap is a length of synthetic cordage. It is tied to the bottom of the carrier and then passes through a slip adapter attached to the wide shoulder strap. This allows you to easily and quickly adjust the shoulder strap as needed. This design is very basic, but it is very light and functional.

The pocket is attached via plastic clips and an elastic strap near the bottom of the carrier. It is 7 inches long x 4 inches wide x 2.5 inches tall. It has a center positioned water resistant zipper running its length. This makes access easy. It will easily carry a few lines (with carriers), a small fly box, and assorted small necessities. If you use this pocket as your only storage you will have to be ultra-selective in what you bring.

Ebira Plus pocket

I carried the Ebira Plus for 8 hours (over my right shoulder) on my fishing trip with Tenkara Guides. At first, I noticed that the Ebira Plus would rotate due to the weight of the rods, but then I tightened up to shoulder cord so that the rods sat snugly against my back. This stopped the rotating. From then on I never even knew the Ebira Plus was there until I needed it.

A typical stretch on a typical Wasatch Front creek

We waded through pools and crawled over boulders. We crouched under trees and around rocky overhangs.  I cast, oh maybe a billion times, and I even caught some fish. The Ebira Plus never got in the way!

Conclusion: So, for a simple, lightweight rod carrier I think this is a nice item. It is pretty restrictive on what it will carry, but if you are selective in what you bring, the Ebira Plus could get you through a day of fishing without using any other gear carrier. After all, isn't that what ultralight adventures are all about!! Simple, light, efficient!!!


TrailLite Designs Ebira Plus Overview (* poor, ***** excellent)

Ease of purchase                       ***** 
Quality of materials                   *****
Fit and Finish                           ***'
Physical Characteristics            ***'
Fishability                                  ***'
Overall                                       **** (4 out of 5 stars)


March 10, 2012

Tenkara USA Ito review

I have purchased and fished a small arsenal of Tenkara rods over the past few months. The most recent is the Tenkara USA Ito. I also have two other excellent Tenkara USA rods: Iwana-12 and Amago. In addition to these I have an Allfishingbuy.com Kasugo-4209. I have fished all of these on the same water, with the same lines, and used the same flies and techniques. It is from my experience with these rods that I am basing my review of the Ito. These other rods are fixed length rods; the Ito is my first "zoom" or variable length rod.


I purchased my Ito directly from Tenkara USA. The rod cost $235.95 plus shipping. I ordered it on March 3rd and received it on March 9th. It came in a long, rectangular box via the USPS. This contrasts with my other Tenkara USA rods which came in crush-resistant triangular mailing tubes.

Case, sleeve, rod

The rod comes in a synthetic fabric sleeve, and this in turn in a protective rod tube. Both the rod tube and sleeve have Tenkara USA and logo on them. The rod tube is light, well made and dark green in color. Both ends have black rubber screw on caps for easy access.  The tube is large enough in diameter that the rod with EZ-Keepers can easily fit inside. The fabric sleeve is dark blue with a hook and loop closure on one end.

The Ito is a very handsome rod. Its aesthetics are flawless. My rod weighs 118.1 grams without the end plug (measured on my Allen analytical 
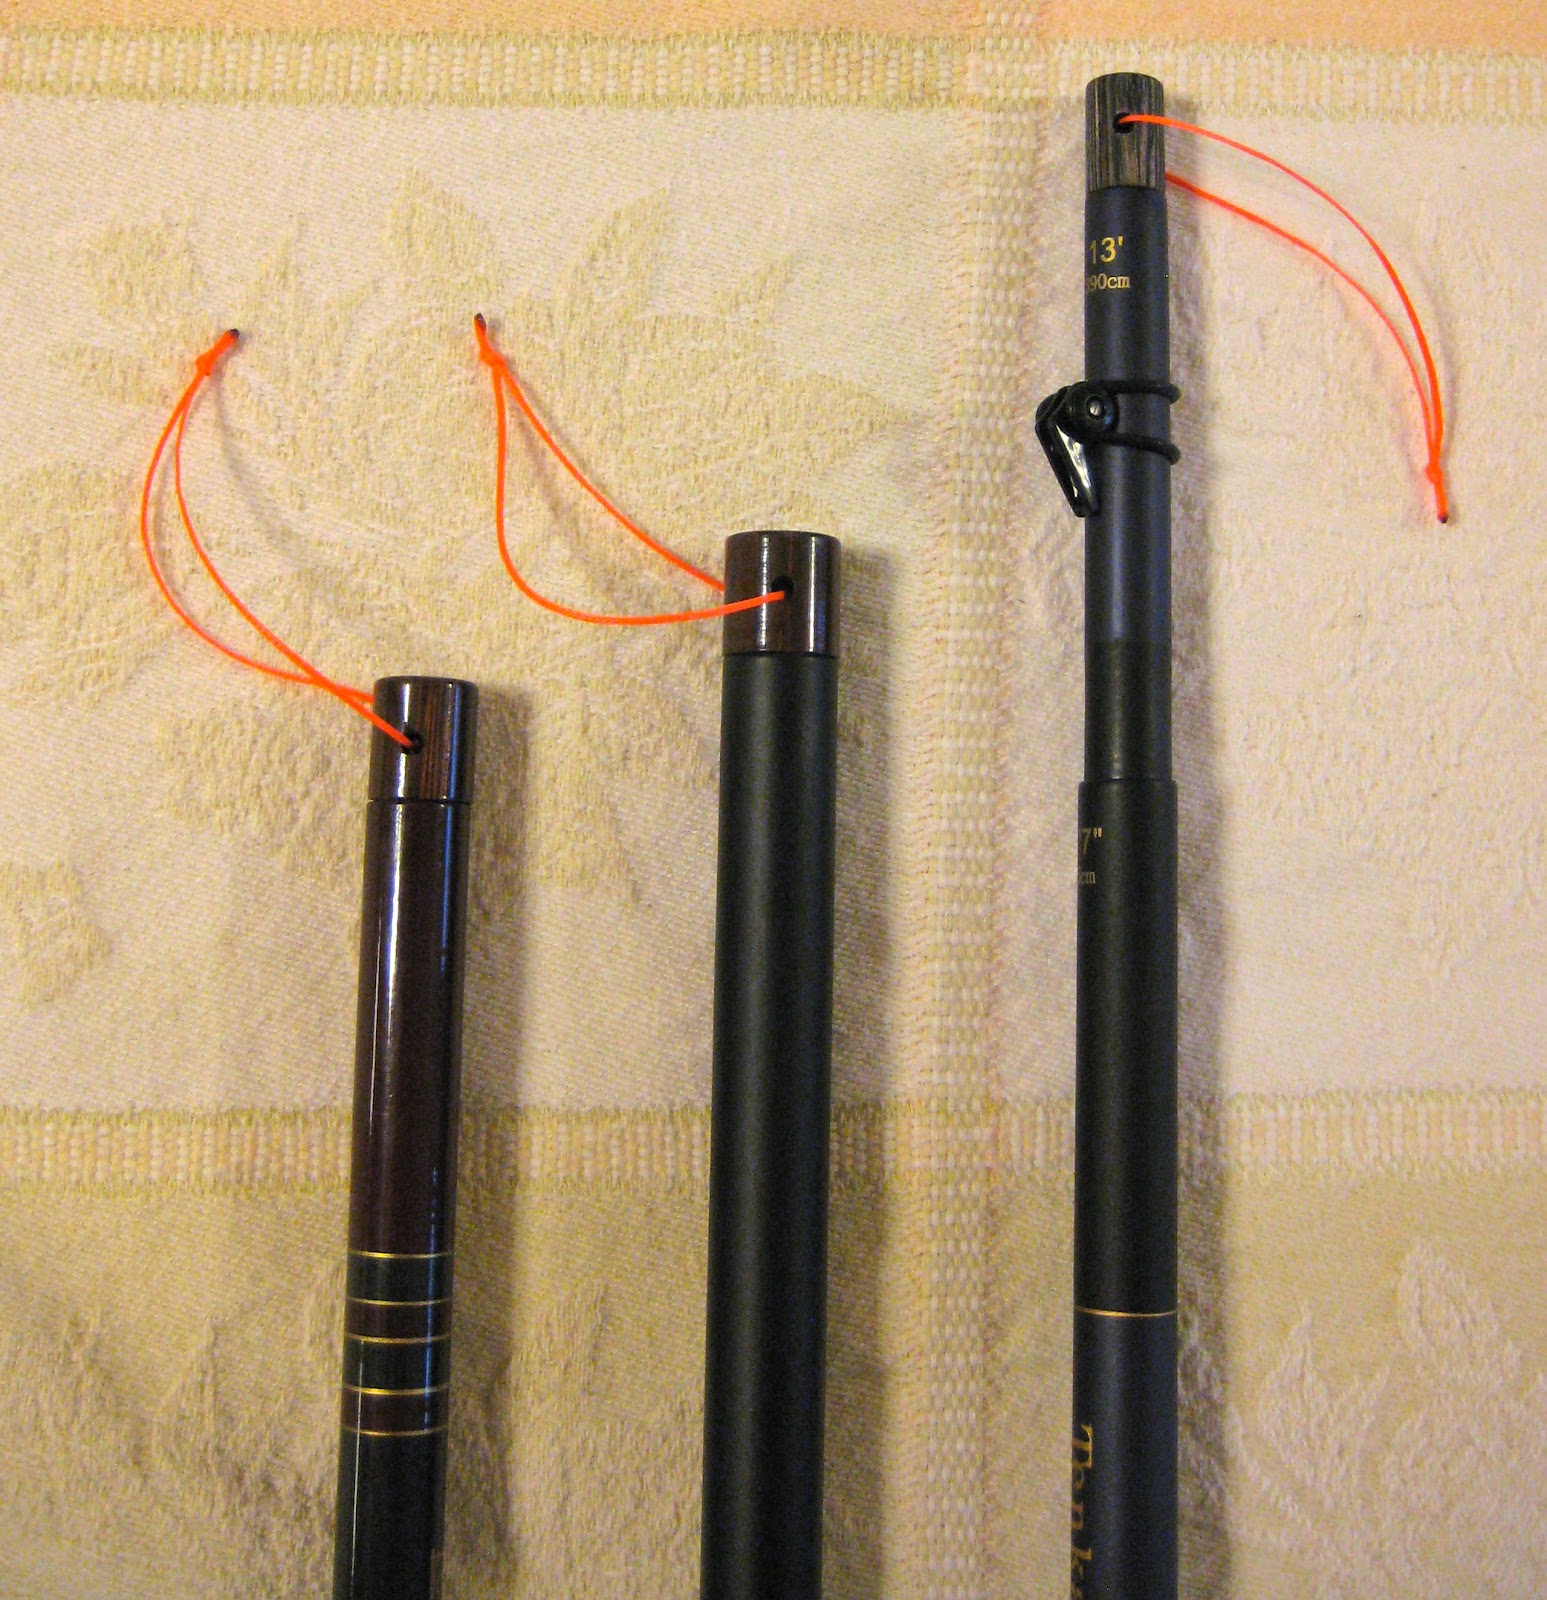
scale). It is advertised as 116 grams. For comparison, my Amago is 97 grams. My Ito is exactly 156 inches (13ft; 396.2cm)  extended in its "unzoomed" configuration. Conversely, it is exactly 175 inches (14ft 7in, 444.5cm) when fully extended or "zoomed". When collapsed it is 27 inches (68.6 cm) with the end plug. This is just a little long for easy travel, unlike the Iwana-12 or Amago. My Amago is 21 inches collapsed.

Left to right: Iwana 12', Amago, Ito, Kasugo-4209

 The Ito is rated a 6:4 "slow" action. The rod has a faux wood plug in the telescoping end and a black anodized metal screw cap with logo on the handle butt. The black metal screw cap unscrews easily, and when in place adequately secures the butt end of the rod. This cap has small O-rings attached which grip the second segment firmly. It is this segment that can be extended or "zoomed" for additional length.


Butt cap with O-rings


The cork handle is 12 feet 5/8 inches (32.1cm) in length. The handle has a gentle turning reminiscent of a full wells, but with elongated curves. The cork appears to be of excellent quality with few filled defects. I would appraise the cork as "AAAA, FLOR or CG1". My other Tenkara rods are "AAA or CG2" for comparison. There is a stainless polished winding check as well.


The finish of the Ito is a non-glare graphite. It has dark blue accents on the ends of the larger segments.  The lillian is red and glued to the tip. The first, or handle, segment is marked 14'7" (445cm). The second segment is marked 13' (390cm). To "zoom" the rod you grasp the second segment and pull it away from the handle. There is a slight hesitation at first due to the base of the second segment being held by the O-rings in the butt cap. When the second segment is fully extended the rod is 14 feet 7 inches. Very cleaver! It is two rods in one!


Fishing the Ito is fun. In 13 foot mode it feels better than in the extended mode, but not similar to my 12 foot Iwana, a 6:4 action rod. The Ito is billed as a 6:4 rod but it is noticeably softer or slower in action than the Iwana-12. However, in the 14 foot 7 inches mode it is even more noticeably softer (floppier) in action. I have not fished a 5:5 rod (as of the date of writing this) but I bet this is what they feel like! When casting in 13 foot mode your strokes are shorter and faster than when in the 14 foot 7 inch mode. In fact, when fully extended, I had to make a conscience effort to slow my strokes and thus make my casts more efficient and effective. Cast too fast with the rod in 14 foot 7 inch mode (which I did quite a few times) and you will dump your tippet into a pile on the water. All in all, the rod casts pretty well in both modes; it dampens relatively quickly, no super wild oscillations although it does have more tip overshoot than the Iwana-12 and Amago. I would not call this overshoot "slop", but it does "noodle" more than the other rods I have used. I used a Tenkara Bum hand tied Hi-Vis line for testing this rod.

The Ito weights slightly more than the Amago, but to me, in its 13 foot mode, it feels a little lighter. I suspect that this is due to a shift in its cantilever balance point when having two graphite segments in the handle. When the rod is fully extended to 14 foot 7 inches it feels like it is 14 feet 7 inches -- tip heavy. The rod is not very fatiguing after 3 hours of steady fishing however, no matter which length mode it is in.

To test the difference of the cantilever effect in both the 13 foot and 14 foot 7 inch modes I used a crude tool like I did for the Kasugo-4209 review. You may want go to that review for details of the tool. Basically I measure the amount of weight it takes to balance the rod tip 30 degrees above horizontal. The fulcrum point is mid-handle.  In the 13 foot mode it took 604.1 grams. In the 14 foot 7 inch mode it took 791.4 grams. As a point of comparison, the Amago took 571 grams and the Kasugo-4209 took 446 grams to balance the tip at 30 degrees. Despite the large difference between the Ito and these other rods, the Ito, as I have said, actually feels lighter to me than the Amago. I am not exactly sure why, but it is a testament to the nature of design and balance of this rod.

Cantilever balance in 13 foot mode


It has been published elsewhere, such as on Tenkara Talk, that one ways to use this rod is to cast and fish in the 13 foot mode, but when a fish is hooked extend the rod to 14 feet 7 inches. This can aid in landing the fish. I used this technique and found it works quite well.  The method of extending the rod, after hooking a fish, that I found works best for me is that while holding the rod with my right hand (I am right hand dominant) reach up with my left hand and grasp the second segment. Since I already have my right arm extended to keep the rod tip high, I just pull the handle segment straight down. This eliminates the need to push the second segment upwards, but accomplishes the same thing, yet in a quicker and smoother motion.

The rod plays the fish comfortably as well. Most of the fish I caught were 10-12 inches, and the water current was modest. These fish/current speeds put a pronounced curve in the rod. Fighting the fish is easy in either length mode but I preferred to extend the rod to full length. This rod does not have the shaft stiffness of the Amago, still, I bet you could control a good sized fish quite comfortably -- but not as well as the Amago, I venture to guess.

Average size for the day
A little smaller
Self portrait with fish on!
CONCLUSION: The Ito is my favorite Tenkara USA rod. Its versatility, varying action, nice balance and, of course, its aesthetics make it a wonderful addition to any Tenkara fishers arsenal. If you are looking for a rod to answer in almost any situation, I would highly recommend the Tenkara US Ito! It is as close to a perfect Tenkara rod as I have seen so far!


Tenkara USA Ito Overview (* poor, ***** excellent)

Ease of purchase                       ***** 
Quality of materials                   *****
Fit and Finish                           *****
Physical Characteristics            ***'
Fishability                                  ***'
Overall                                       ****' (4.4 out of 5 stars)


I have a video of the fish I caught with this rod on my blog entry "A tough day on the river".  You can see some of the fish fighting in the clear water. Take a look, it is pretty fun.

An updated impression of this rod, and other rods I have used can be read HERE.


March 9, 2012

A tough day on the river

I went to the Black Canyon again today to test the Tenkara USA Ito. I will post my review of this rod in an upcoming entry.

The day was bright, full sun and thus the fish were pretty skittish. I had to approach very slowly and use a 5 foot 6x fluorocarbon tippet. Even with this I generally got only one, maybe two, casts per fish. There was slower than usual surface activity but there were many adult midges on the water. There were also some small BWO duns.

I did manage to catch few fish in the 10-12 inch range. I hooked them on #20 Stillborn midge (Roger Hill version), #18 olive Klinkhammer, and one on a #16 red zebra midge. The Hill Stillborn midge is one of my most favorite midge patterns. I first fished the pattern after reading Roger Hill's book "Fly fishing the South Platte River: an anglers guide" in 1994. That book changed my life and the way I fished small flies. It helped me greatly on the South Platte -- that most frustrating of rivers.

Anyway, a few fish hooked today, but I probably put down even more. Here is a video of some of the fish. BTW, the water was pretty clear and the sun angle was just right that you can see the fish under the water during their fight.  ...Pretty cool....! Again, it may be better to watch in Youtube.


March 8, 2012

Chota Hippies

I usually "wet" wade when fishing small streams.  I guess I should really say that I try not to wade through small streams, but when I have to I usually wet wade. I wear waterproof leather Wellington boots by Georgia Boot and they do a great job until I step into a hole deeper that 12 inches.  That is were the "wet" comes in.

This year I wanted to try to keep my feet drier so I thought I'd go for a pair of hip waders. Then I came across Chota Hippies and thought that they would be perfect.


Chota Hippies are marketed as wading socks but you can expand them into three different lengths: below the knee, above the knee, and hip waders. They are built from three ply breathable laminate attached to a 3mm thick neoprene sock. There is a neoprene band with a cinch strap that fits just below your knee. These help keep the sock from sliding down. They also protect against a sudden filling of your sock if you overstep your depth limit. There is a built in gravel guard as well. All seams are tape sealed. The sewing and materials appear to be high quality. They are a little spendy at $119.95, but most of Chota products are on the upper end of the price scale. Chota does have a less expensive product called Caney Fork Breathable Knee High Wading Sock. I did not buy this product because I do on occasion need to navigate through deeper pools.

Neoprene band and cinch strap

Neoprene sock and gravel guard with hook


Attached to the upper portion of the sock is a black elastic shock cord. It helps in adjusting the length of the sock and can be used to secure the sock to your belt when the sock is in its full "hipper" position.

To use the below the knee length, just tighten the shock cord somewhat and pull the top to the sock down to the boot. Then roll up to the knee. It stays put.

Knee length
To use thigh length for deeper water, just unroll and pull to sock all the way up. stretch the shock cord to your belt and secure.

Hip length -- I need to loose some weight, what a belly!

Finally,  if you need something in between, just roll them down to above the knee. They are a little baggy in this length but they are affective. I use them mainly in the "below the knee" length and full hip length.

Above the knee length
So, if you are like me and don't like to wear full waist high or chest high waders for fishing small streams, or of you don't already have hip boots, then consider Chota Hippies. They are quite cleaver, high quality,and very effective.


March 4, 2012

This is not Tenkara but.....

...... it may be of some use to a few of you.

I have a hard time seeing very small dry flies, emergers, or small soft hackles greased in the surface film. I even have a hard time seeing where my line is so I can keep it tight to a kebari or subsurface soft hackle.  I frequently use highly visible lines such as Chris Stewart's Hi-Vis hand tied lines, which are marvelous, but there are occasions when I can't see my fly. I typically use 6-7x fluorocarbon tippets of 3-6 feet which can complicate the problem. I am not old and I am not blind, but I am not as young as I used to be either!

When I fish a very small dry fly or multiple small flies I will often use a small piece of an orange foam indicator a couple of feet above the fly(s). It is so small and light that it does not affect casting and it does not splash down hard has some indicators may do. I occasionally use a larger fly, say a #16 Klinkhammer with an orange/yellow post, as an indicator but when the fish are taking small midges or mayflies (#20-24) I like to optimize my catch rate by having all flies of the right size.  The indicator is easy for me to see as soon as the tippet lands on the water, and if there is a riseform within a few feet of the indicator I lift the rod tip. More often than not I will then have a fish on!

The indicator that I like to use is Rio Kahuna LT. It is a very small diameter brightly orange foam cylinder loaded on a large monofilament core. It can be frustrating to use at the stream side but it is easy to use with a little preparation.


I like to use lengths between 1/8th inch to 1 inch. I most commonly use 1/4 inch length however. This seems to be optimal for size and visibility.  Cut the material to your desired length and remove the mono core.

To make it easy to use at the stream side, even with gloves on, I preload the the sections onto monofilament loops at home (2x tippet material works great) then place them in a small clear plastic bag. This bag then goes in my Tenkara fishing kit. It takes up no space at all.

To make getting the foam onto the mono loop easier I use a wire bobbin threader. Slide the foam onto the bobbin threader, slip the mono loop through the wire loop and then slide the foam section onto the mono loop. I make different lengths so to be prepared for any situation.

Loaded onto bobbin threader

Preloaded sections ready to go into my small Tenkara kit (Left to right, 1 inch to 1/8th inch)
To use at the stream side, just thread your tippet through the mono loop and slide the indicator onto you tippet. It's just that simple. I then slide the foam up to the loop-to-loop connection between my line and tippet or to a double surgeon's knot between tippet segments. Move the indicator over a small knot and it will stay there due to its minuscule mass. That's it!  I have even used two or three 1/8th inch segments on the same tippet, but each placed 1 foot apart. In very difficult fishing situations, like at dusk when the water surface is covered in PMD spinners, this trick can help "point the way" to your fly making a hook up much easier to see.

1/8th size positioned over a small knot just upline from a loop-to-loop connection

If I am fishing subsurface I will hold the rod tip high enough to just keep the foam indicator off the water, thus making it an excellent sighter. Because it has essentially no weight or wind resistance it does not interfere with line control. This method keeps the line tight for an effective kebari technique but makes it easy for me to see the line position as well. If later I want to change to small dry flies then I have an indicator or dry fly sighter already in place. I just change the flies and go right back to fishing.  It is very efficient and has minimal down time. Remember, if the fly isn't on (or in) the water then you can't catch a fish! Also, I often will just leave the indicator on the line when I put the line away.

I hope this helps those of you, who like me, have trouble seeing small flies and thus miss fish when they take. My hook up rate when using small dries or emergers has easily doubled since I began using this small foam "sighter".

I know this is not a traditional Tenkara technique, but sometimes you have to give the fish what they want. If they are taking micro-Beatis then give it to them. Though not Tenkara, now I can use a long rod, light tippet, Tenkara perfect feather-like targeted presentation, and the ultimate in drag-free drifts and still see when that elusive spring creek rainbow takes my #22 BWO dry or #24 midge emerger! Nice!!!!!!!!!


March 1, 2012

Black Canyon of Bear River 3_1_2012

I fished the river today and had it all to myself. The weather was cold at 25 degrees F with intermittent snow flurries. There was a 4-6 knot breeze from the South. I fished the same section of the river that I fished for my furled line review. On that day I was having difficulty getting the fish to take most anything that I offered; I think I was offering too large of a fly at #16. Today I could see that they were taking small BWO duns on the surface, so I presented a Barr's #18-20 olive Vis-a-Duns. This worked really well catching most of the fish. I also used a #18 BWO parachute and a #18 BWO parachute emerger with trailing shuck. They worked well also. None of the fish wanted anything subsurface; at least not anything I was offering them.

Because the dry flies were so small I had a harder time seeing them, therefore I put a 3/4 inch section of Rio Kahuna LT on the tippet and secured it where the loop-to-loop connection with the line was. This gave me something to see even though I could not always see the flies. If a fish rose near the Kahuna then I'd lift the rod. Most of the time I hooked the fish.

An average fish
I used the Kasugo-4209 with a 13.5 foot Stewart HiVis hand tied line. This worked a lot better with the breeze than the furled lines. The HiVis line was much less affected by the breeze and it didn't drag the fly like the furled lines did. I used a 4 foot 6x fluorocarbon tippet.

My box -- I don't carry much any more
I did hook one quite large fish today.  I would estimate that she was 15-16 inches, but she threw the fly about half way through the fight. What a disappointment. Most of the fish were 8-12 inches, with the larger fish giving a good fight.

Another in the net
One thing I learned today was that although Glacier Gloves keep my fingers warmer than fingerless fishing gloves, I could not hold any fish! The Glacier Gloves I have made the fish really slippery.

A little native cutthroat

All in all, it was a pretty good day.

Here is a video of today's highlights. I had the camera angled too low so the view is a little odd, sorry. Still, you can get the gist of the fishing. You may want to view it in YouTube.