
I've always loved knives. Folders, fixed blade, full tang, rat tail tang, flat grind, saber grind, scandi grind, whatever. I love knives. It probable stems from the fact that my mother would never let me use knives, even in scouts. I think she was scared of them. Any knife I received she took away (interestingly enough, she never took my guns away).
My favorite knives are fixed blade, or what my grandpa used to call a "sheath knife". Grandpa made his own hunting knives, and I have the last one he made.
My favorite style of fixed blade is the "bushcraft" knife. It is usually made from high carbon steel, with a scandi grind, and made to take a beating. Bushcraft knives are usually not as long or large as "survival" knives. They are elegant and simple in design with understated curves. I think a well done bushcraft knife is a functional work of art.
In my life of various outdoor pursuits, if I like doing something I usually end up trying to make my own gear. In the 70's (when I was in my teens) I was into archery, so I made my own 70 lb recurve bow. It took me about 6 months. I also made my own bow strings and arrows. I learned to tie flies in the early 70's as well, but I didn't start making my own graphite fly rods until the mid 90's.
Recently I thought that I'd like to make my own fixed blade knife. I wanted to make it in a bushcraft design, but since I have other full sized bushcraft knives, I thought I'd like to make this knife just a little bit shorter. That would make it lighter and easier to carry. I didn't make it specifically to baton, rather I wanted it to be a good all a-rounder, slicing, cutting, feather sticks, etc. I usually carry a Gransfors hatchet for processing firewood.
So, I did some research online (it sure is a lot easier to find information now days than it was in the 1970's). I got my materials together and started.
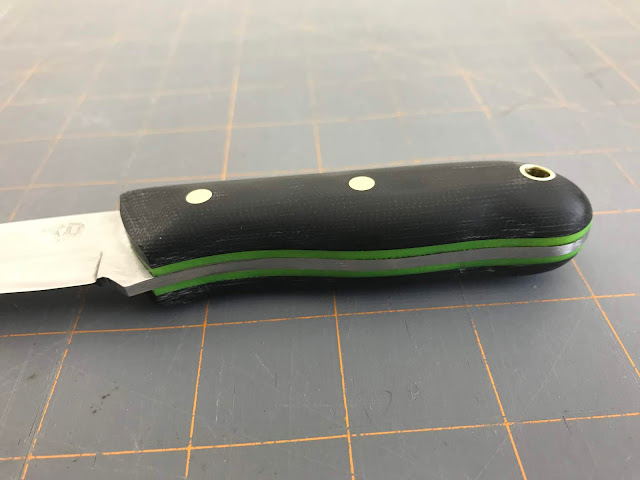
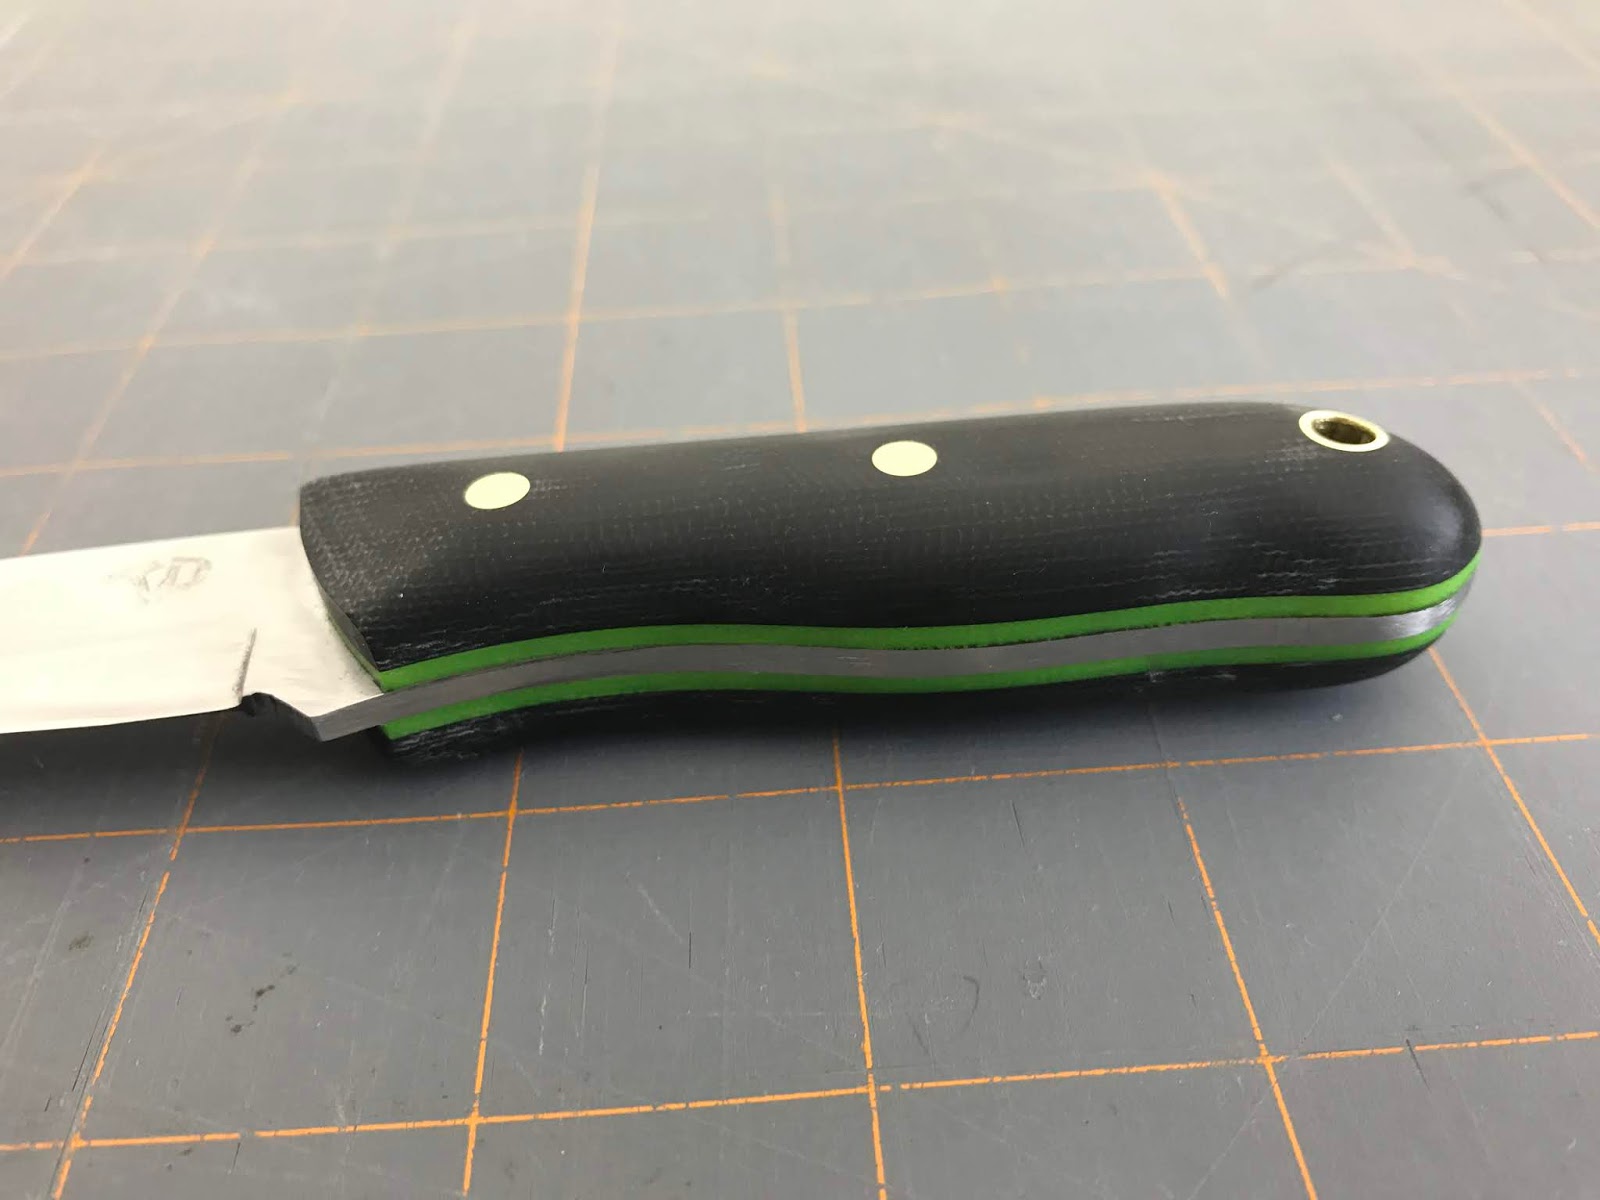
I chose 0.125" x 1.5" O-1 tool steel for my blade. I also decided on green G10 liners and black Micarta scales. After drawing out the design and gluing it on the steel I cut it out roughly with an angle grinder. I then shaped it with my belt grinder. I drilled holes in the tang for brass pins and a lanyard hole as well as others to reduce the weight and hold the epoxy.


Following that, I ground the edge bevel. I decided to do it by hand with a file instead of on my belt grinder, as I wanted more control. I'll practice and do other knives with the belt sander, but the first knife I made I wanted to be made by hand.

I did a modified scandi grind. Next, I hand sanded the blade with 120, 150, 220, 440, 800 grit sand paper.

Next step was normalizing the steel. I used my forge to bring the blade up to 1425-50 degrees F (about when O-1 tool steel looses its magnetic attraction. This is called the Curie point.), and then let it cool slowly in the air. I did this three times.
After normalizing I heat treated the blade by bringing it slowing and evenly back up to the Curie point (again, about 1400-1450 degrees F). I then quickly plunged the blade, using a slicing motion, into warm (160 degrees F) canola oil. After the blade had cooled, I could see that my heat treat was good because a Nicholson mill file just skipped off the edge and would not bite. My knife is probably a Rockwell of 62-65, I'd guess.


Right after the heat treat I used my wife's oven (which has been calibrated) to temper the steel. I did 415 degrees for two hours, let the blade cool in the oven to room temperature, then repeated the process again. That gave me a total of 4 hours at 415 degrees F.


Next I hand sanded the blade again to 800 grit for a satin finish. Following this I electrochemically etched my initials onto the blade using salt water and a 6V battery.
I then epoxied the G10 liners onto the Micarta scales. After the epoxy hardened I drilled the scales for the pins, epoxied the scales onto the tang, and clamped it up.


After a full 24 hour cure I used the belt sander to grind down the pins and shape the handle. I then hand sanded the handle up to 800 grit.


After I got the handle shape I wanted, I used my Edge Pro to sharpen the knife edge with a slight convex edge for strength. Following sharpening I stropped (green compound) for 50 times each side. It is now shaving sharp!

I sealed the Micarta scales with WD-40 and did a final sanding with 800 grit. This is what I ended up with:

I'm very pleased with how it turned out, given it was my first time making a fixed blade knife. I'll make a loop for my 5th finger (a pinky loop) to help stabilize the knife when cutting. Now, I have to learn how to make a sheath!
If you have any experience making your own knife, let me know. I'd love to hear how it turned out for you.

My favorite knives are fixed blade, or what my grandpa used to call a "sheath knife". Grandpa made his own hunting knives, and I have the last one he made.
 |
| Grandpa's last knife, with sheath. |
My favorite style of fixed blade is the "bushcraft" knife. It is usually made from high carbon steel, with a scandi grind, and made to take a beating. Bushcraft knives are usually not as long or large as "survival" knives. They are elegant and simple in design with understated curves. I think a well done bushcraft knife is a functional work of art.
In my life of various outdoor pursuits, if I like doing something I usually end up trying to make my own gear. In the 70's (when I was in my teens) I was into archery, so I made my own 70 lb recurve bow. It took me about 6 months. I also made my own bow strings and arrows. I learned to tie flies in the early 70's as well, but I didn't start making my own graphite fly rods until the mid 90's.
 |
| My old bow. It has been a good friend all these years! |
Recently I thought that I'd like to make my own fixed blade knife. I wanted to make it in a bushcraft design, but since I have other full sized bushcraft knives, I thought I'd like to make this knife just a little bit shorter. That would make it lighter and easier to carry. I didn't make it specifically to baton, rather I wanted it to be a good all a-rounder, slicing, cutting, feather sticks, etc. I usually carry a Gransfors hatchet for processing firewood.
So, I did some research online (it sure is a lot easier to find information now days than it was in the 1970's). I got my materials together and started.
I chose 0.125" x 1.5" O-1 tool steel for my blade. I also decided on green G10 liners and black Micarta scales. After drawing out the design and gluing it on the steel I cut it out roughly with an angle grinder. I then shaped it with my belt grinder. I drilled holes in the tang for brass pins and a lanyard hole as well as others to reduce the weight and hold the epoxy.


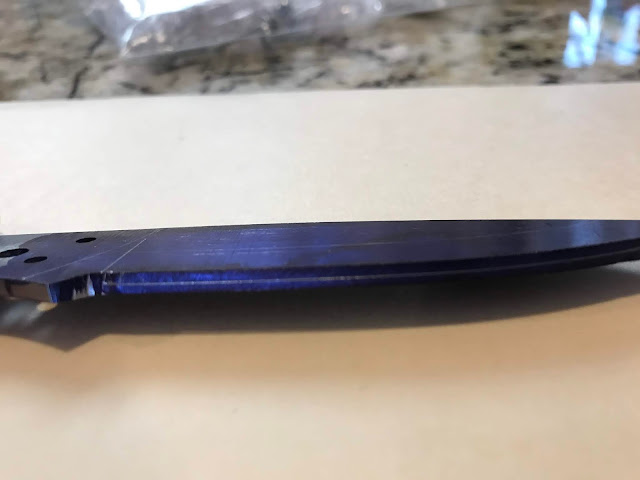
Following that, I ground the edge bevel. I decided to do it by hand with a file instead of on my belt grinder, as I wanted more control. I'll practice and do other knives with the belt sander, but the first knife I made I wanted to be made by hand.

 |
| Getting there. Just a little more to remove. |
I did a modified scandi grind. Next, I hand sanded the blade with 120, 150, 220, 440, 800 grit sand paper.

Next step was normalizing the steel. I used my forge to bring the blade up to 1425-50 degrees F (about when O-1 tool steel looses its magnetic attraction. This is called the Curie point.), and then let it cool slowly in the air. I did this three times.
After normalizing I heat treated the blade by bringing it slowing and evenly back up to the Curie point (again, about 1400-1450 degrees F). I then quickly plunged the blade, using a slicing motion, into warm (160 degrees F) canola oil. After the blade had cooled, I could see that my heat treat was good because a Nicholson mill file just skipped off the edge and would not bite. My knife is probably a Rockwell of 62-65, I'd guess.


Right after the heat treat I used my wife's oven (which has been calibrated) to temper the steel. I did 415 degrees for two hours, let the blade cool in the oven to room temperature, then repeated the process again. That gave me a total of 4 hours at 415 degrees F.


Next I hand sanded the blade again to 800 grit for a satin finish. Following this I electrochemically etched my initials onto the blade using salt water and a 6V battery.
 |
| It's supposed to be a stylized "TVD". |
I then epoxied the G10 liners onto the Micarta scales. After the epoxy hardened I drilled the scales for the pins, epoxied the scales onto the tang, and clamped it up.


After a full 24 hour cure I used the belt sander to grind down the pins and shape the handle. I then hand sanded the handle up to 800 grit.


After I got the handle shape I wanted, I used my Edge Pro to sharpen the knife edge with a slight convex edge for strength. Following sharpening I stropped (green compound) for 50 times each side. It is now shaving sharp!

I sealed the Micarta scales with WD-40 and did a final sanding with 800 grit. This is what I ended up with:

I'm very pleased with how it turned out, given it was my first time making a fixed blade knife. I'll make a loop for my 5th finger (a pinky loop) to help stabilize the knife when cutting. Now, I have to learn how to make a sheath!
If you have any experience making your own knife, let me know. I'd love to hear how it turned out for you.
Is that a Hoyt bow? Looks familiar.
ReplyDeleteDefinitely not Hoyt, but thanks for the compliment. Browning laminate components with raw block wood. I made the bow myself in high school shop class.
DeleteIs there anything you cannot do?! Amazing!
ReplyDeleteNick I don't think so.
ReplyDeleteTom I never knew there was so much work involved in crafting a knife.
The bow is beautiful.
What a beautiful knife. It looks serviceable but not too fancy. I believe that you would do very well on the TV show, forged in fire way to go Tom!
ReplyDeleteThat's incredible. Also looks like an incredible amount of work. Nicely done. I'll stick to tying flies!
ReplyDeleteVery nice Knife,like the shape, thanks for sharing the build. Cheers. :-)
ReplyDelete